What is Compression: The Basics of Home Recording (Part II)
Welcome to week two of our weekly blog series providing all kinds of tips and helpful hints for anyone recording at home. We hope the series will be of use to everyone from the beginner just putting together his or her first recording setup to those that have been making records at home for years.
Last week, we looked at the common question “ What is EQ? ” in Part 1 of the Basics of Home Recording, and this week’s part two tackles another common inquiry: “What is Compression?” We wanted to start with these two topics because both are used on just about every track ever recorded, whether they are mixed by a beginner in a basement or by a music mastering engineer here at Sage Audio (and other mastering and recording studios around the world).
When used correctly, compression and EQ can make decently recorded tracks sound good, and they can turn tracks that were recorded very well into phenomenal records. So let’s get right to it.
What is Compression?
First, I should specify that I’m talking here of dynamic range compression, which is not the same as lossy data compression (i.e. mp3 or mpeg-4). Dynamic range compression, like it’s name would suggest, controls the dynamics of a track, or the difference between the quietest part of a track and the loudest part. Put simply, compression offers a sort of automatic volume control to decrease the difference between the softest notes and the loudest notes.
Example: Vocal Track Compression
The easiest way to explain this is through an example of a vocal track. Singers don’t sing at the same volume for the entirety of a vocal track, which can lead to parts of a vocal being buried underneath the mix while other parts stand out because they are far too loud.
Compression decreases the span between the loudest parts of the vocal and the quietest parts by turning down the volume peaks of a track while increasing the quietest parts of the track. This is done primarily with four tools, which are included on almost every compressor:

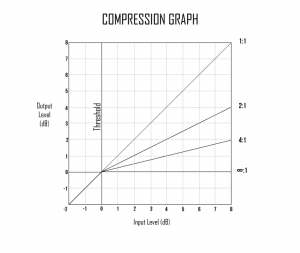
Threshold – this sets the level at which every volume above the specified threshold is made softer.
Ratio – This is how much softer the volume of the source will be made. For example, if the ratio is set at 4:1, then for every 4 decibels (dB) the volume goes above the threshold, then the actual output level is a 1 dB greater than the input level. Attack – This sets how quickly the volume reduction will occur, usually around 5-30 milliseconds. Release – Finally, the release specifies how quickly the volume will come back up after it has been turned down.
There are other components on many compressors like knee and gain control, but a basic understanding of these four components will have you effectively compressing tracks in no time.
Why Use a Compressor
Let’s stick with the vocal track example. When you’ve decreased the dynamic range of a vocal, the track “sits” much better in the mix since you’re not losing the quiet notes and being blown away by the loud ones. It also tends to “fatten” up the sound of tracks, which is why compression is often so important on bass and drum tracks.
Don’t Compress Too Much
One danger of using is a compressor is applying too much compression to a track. Although it is often very beneficial to compress a track, overuse of compression will result in unnatural sounding tracks that feel very awkward in a mix.
Like EQ and just about any other aspect of recording, once you have a basic understanding of compression, you should always try different approaches and settings until your track sounds the way you want it to. This is the best way to really find out what a compressor does and how best to use it in your mix.


