Mix Bus Compression
So what is mix-bus compression exactly? Put simply, it is the use of a compressor on the stereo mix-bus within in your DAW or console output. When used correctly, this type of compression can add cohesiveness and punch to mixes that may have been missing before. How does this happen? Let’s start with compression on a single track.
The use of a compressor on a single instrument can do lots of good. Outside of the dynamic control, the compressor you choose may provide a tonal color that you like for a particular instrument. Maybe you like the way it sounds when gain reduction kicks in. The same idea applies to the mix-bus as well except that every instrument is contributing to the behavior of the compressor you have selected. Since the compressor is looking at the mix as a whole rather than individual tracks, the color and behavior are applied to every instrument which in turn creates the cohesive or “glued” sound that this technique has become known for.
It is important to note that when deciding to use mix-bus compression, it should not be applied after a mix has been completed. If you have put time into perfecting your mix with individual track EQ, compression, and fader moves, throwing a compressor onto the mix-bus will yield results that you may not have expected. All of the balances you have worked hard to achieve are now subject to more dynamic control which could very well throw off the balance or vibe of your mix. Because of this, the compressor must be applied to the mix-bus before mix decisions are made. This way, you will be mixing into the compressor and monitoring its output, making your decisions on individual track EQ and compression more appropriate for the song and the signal chain.
Choice of Equipment
As with any type of dynamic control, you will want to choose the correct tool for the job. Maybe your mix needs a vintage type of tone to it, maybe you want the benefits of mix-bus compression without any color applied. While all compressors will help create the glue and punch, they will all do it differently based on what kind of compressor you have chosen. There are a few different types of compressors that will yield different results for your mix.
VCA (Voltage Controlled Amplifier)
This type of compressor is known for being quick to react to transients while remaining rather transparent in its coloration. They work using these VCA (sometimes IC chips) to apply gain reduction based on the incoming voltage into the circuit. Since they are able to apply lots of gain reduction with little added color, the VCA compressor can be great for mixes that have many repeated, percussive transients. As mix-bus compressors, the transparency of VCA circuits can provide the cohesive sound to your mix without coloration, perfect for those who want the glue and punch without a sonic character attached.
Examples of popular VCA compressors are the API 2500, SSL G-Series, and the DBX 160.
Optical
Optical compressors are also known for being pretty transparent, but they differ from VCA’s in how quickly they are able to react to transients. As the name might imply, optical compressors use an optical detector circuit to apply gain reduction. As signal enters the compressor, a bulb or other light source reacts to the intensity of the signal, getting brighter as it intensifies. Because of this, sharp transients are much harder to detect since the bulb will not react as quickly to a sudden change in the level of the signal. This makes optical compression harder to use on percussive instruments, but when applied to the mix-bus, an optical compressor can work wonders in creating less contrast between sections of songs (i.e. the verse is quiet and the chorus is loud). The smooth response would reduce the amount of compression applied directly to sharp transients, leaving your mix with the punch and life it needs. Paired with the transparency that optical compressors provide, this design could be a good choice for mixes that need glue with minimal effect on color and sharp transients.
Examples of popular Optical compressors are the Teletronix LA-2A, Manley ELOP, and Tube-Tech CL 1B.
FET (Field Effect Transistor)
FET compression is often used when color is desired, fast attack times are required, or both. Often used as a way to emulate a tube circuit, these FET circuits have a special type of bright punch and warmth that you can hear when they are working. The Urei 1176 is perhaps the most famous FET compressor available and a popular application is to use it on drums and bass. The sound of this compressor on these instruments adds bite and punch to the signal as a part of its coloration. While FET compressors are not always the first choice for mix-bus applications, the phrase “if it sounds good, then it is good” is something to keep in mind before writing off FET compressors on the mix-bus. Your mix may benefit from the fast attack times of these designs as well as the bite and warmth they often introduce to the sound.
Examples of popular FET compressors are the Urei 1176 and Empirical Labs Distressor.
Vari-Mu & Tube
This style of compression is also characterized by its distinctive coloration of sound. Much like a tube mic or preamp, these colors are often rich and warm with a small, but pleasing amount of harmonic distortion. Tube compressors on the mix bus are known for their smooth qualities. Much like an optical circuit, tube designs will not react as quickly as VCA or FET compressors so much of your transient compression may need to be applied to individual tracks. However, their smooth attack can glue together mixes in a very pleasing way that won’t crush your transients altogether. Paired with the ability to add warmth to songs that need a fatter sound or a vintage vibe, tube compressors can be a valuable tool on your mix-bus.
Examples of popular tube compressors are the Fairchild 670 & Manley Variable Mu.
Digital
For many engineers, the price of analog hardware makes an in the box mix the only option. Luckily, many of the previously mentioned compressors are available as plugins to use inside of your DAW making mix-bus compression a technique that any engineer can experiment with. Outside of hardware emulations, there are digital compressors that look to offer their own, unique sound ranging from heavy coloration to complete transparency. With so many options, digital compression may have what your mix needs at a fraction of the cost of hardware.
Examples of popular digital compressors are the Softube Tube-Tech CL 1B, UAD 1176LN, Fabfilter Pro-C, and Kush Audio UBK-1.
Settings

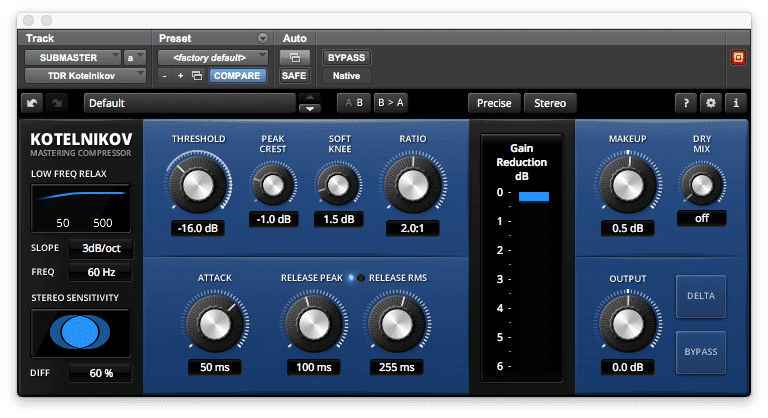
“A good starting setting for ratio, attack, and release on the TDR Kotelnikov Compressor.”
Now that you have the right tool for the job, how do you go about choosing your settings? The main thing to remember here is that you are not looking to compress too hard. Your mix will sound cohesive with much more modest settings than you might be used to for individual track compression. A good target for gain reduction is 3 dB or less so start by setting your threshold to allow for 1-3 dB of gain reduction. This way you can still even out dynamics of your mix without crushing all of your transients or getting a negative pumping effect from your compressor. For your ratio, start with a setting ranging from 1.5:1 to 2:1. A lower ratio will allow your mix to breathe and still maintain the life coming from individual instruments, but will also grab any transients that may still be lingering. Your attack and release settings will be where the fine tuning happens. Extremely fast attack times may give the effect of a limiter, so setting them a bit slower is the name of the game here. Start with a moderate setting of 50 ms. This will allow the compressor to work with the loudest of dynamics, but will prevent it from reacting every time the snare drum (or any transient) sounds.

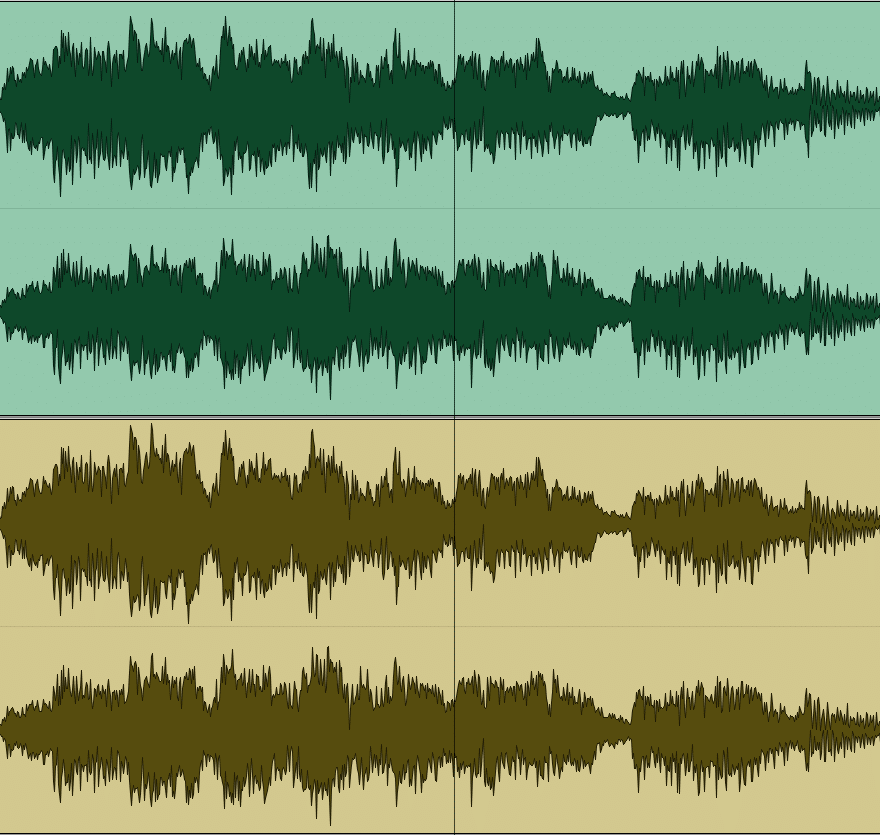
“The top waveform has mix-bus compression applied but looks very similar to the waveform without. Notice that only the loudest of peaks have been controlled by the compressor.”
For release times, start with a similar, moderate approach. 150 ms is a good place to start, but chances are, your release settings will need to tuned to the song itself. In many cases, it is good to set your release time based on which instrument(s) are driving your song. Watching your gain reduction meter will give you an idea on how to set your release time. Let’s say that your snare drum hits are your point of reference. Whenever a hit triggers the gain reduction meter, try and set the release so that before the next hit, your gain reduction meter has returned to zero. That may seem easy if you set a quick release time, but you should avoid setting a fast release just for the sake of getting back to zero. Try and find the sweet spot where your release is natural and together with the rhythm of your transients rather than dropping back to zero abruptly. In some cases, the best way to achieve the desired release time is to use auto release, a feature that many digital and some hardware compressors have. Whether this function uses code or circuitry, the auto-release function will respond accordingly to the incoming signal at different moments in a mix allowing for changes in release time depending on what it sees. Like many discoveries in audio, you have to be creative. Experiment with different combinations of compressors and settings and find what works to give your mix the punch and glue that suits it.


