Using Mix Bus Compression Before Mastering
Mix engineers of all experience levels are familiar with how a compressor can be used to control the transient content of various input source signals. However, a common topic of confusion is the use of compression across the complexity of an entire mix. Many would argue that applying compression to the entire mix is a job meant for the experienced mastering engineer. Although the latter is true, it is also true that mix bus compression before mastering is a common technique among many notable mix engineers. Whether an engineer uses mix compression or not, is not all that relevant; how an engineer uses it is. In this article we will, in simple terms, examine some key ideas surrounding mix bus compression before mastering, and we will go over how to start applying it to your projects.
When to Apply Mix Bus Compression
The most common mistake regarding mix compression is the order in which it is applied. That is, novice engineers will often instantiate a compressor after they achieve a balanced mix with fader positions and inserts. The problem is that the compressor changes the balance and transient response of the original mix; thus, any prior work done by the mix engineer loses its integrity and intention. Instead, the a better order would be to instantiate a compressor on the mix bus prior to diving into the mix treatment. Doing so will allow the engineer to mix through the compressor with intent. Hearing the result of pushing faders through the compressor in real time is the key.
Ideal Compressors
There are many great options when choosing a compressor for the mix bus. This is true in both the analog and digital realm, and the good news is that many of the highest quality digital plugins are aiming emulate the brilliant circuitry and components of classic analog hardware. While some purists still swear by their analog go–to’s, there is no question that digital profiling and modeling is doing an impressive job of mimicking the classics. There is more good news! The digital replication of analog gear keeps getting better and more accurate. It also allows for things like perfect automation and recall, which a hardware compressor is not capable of. It is an exciting time for those without the means to purchase the analog compressor that was used in their recent favorite record. However, if you have the means to purchase the real thing, that is really cool too!

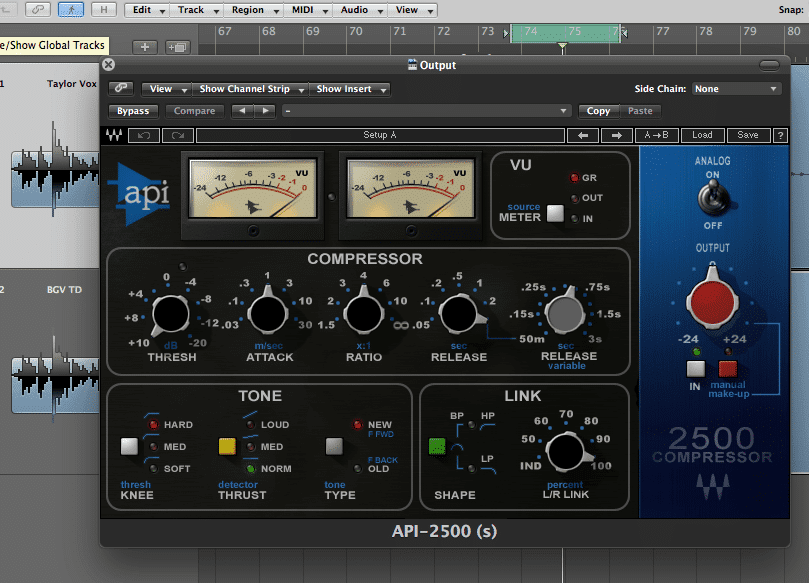
Looking for a punchy bus compressor? The Waves API 2500 does a nice job at emulating the classic punch of its hardware predecessor
The first thing to ask yourself is what you want out of your mix bus compression? Potentially the search is for a compressor that sounds clean and detailed. On the other hand, you may seek one that adds warmth and harmonic saturation. It will largely be dependent on project style and genre. A world of compressors with unique variations regarding coloration, circuitry, and control parameters (or lack thereof) are available. Familiarize yourself with the general differences between VCA, Tube, Optical, and FET compressors, and pick a mix bus compressor that aligns with a sonic goal. Regardless of your choice, a stereo compressor or dual mono with a stereo link option is required for effective mix bus compression as both L/R sides need to react in an identical matter.
General Compression Use
The loudest source signals in a mix will be the first cross the threshold of the mix-bus compressor. The important thing to keep in mind is that the whole mix will move based on how the loudest transient content crosses the compression threshold. The loudest elements that cross the threshold may be the vocal, the kick drum, or a guitar track and will probably be a combination of each those elements at different times. It is important to keep in mind that the faders will behave differently once the compressor is on the mix bus. If a kick drum is the loudest element of the mix and you push its corresponding fader up, then the compressor is causing even more gain reduction to the kick along with the whole mix under it. At times mixing into a bus compressor can feel like the faders aren’t doing as much work when the louder elements are pushed. The reason for that is the increased gain reduction that takes place on the mix bus. Don’t overdo it! We will discuss more on proper gain reduction below.
Setting the Ratio and Threshold
The first thing to do when setting a compressor on the mix bus is choose the ratio and threshold. Setting these two parameters is quick and straightforward for mix bus purposes. Start with a low ratio – 2:1 is often plenty. Next adjust the threshold while looking at the gain reduction caused by the compressor. Lower the threshold until a touch of gain reduction is a achieved. 2dB or 3dB of gain reduction is a great starting point. As discussed earlier, most compression parameters are best left untouched on the mix bus after it has been set. However, if elements and instruments are added to the session as the mix progresses, then be careful of where your threshold is set. It is imperative to know how much gain reduction the compressor is performing when the mix is at its loudest point. Do not over compress!

Waves Puigchild 670 showing an ideal amount of gain reduction (up to 2 db) on the mix bus.
Setting the Attack Time
A great starting point when setting an attack time on the mix bus is to use a medium attack time. There are two essential numbers that an engineer must memorize to understand relative attack times. Those numbers are 8 and 25. Between those numbers are medium attack times. Above 25ms are slow attack times. Below 8ms are fast attack times. Some people find it helpful to think about the numbers 10ms and 30s for an approximate reference that is easier to memorize. Anyways, lets keep it simple and move on – start around 10ms and use your ears!
Setting the Release Time
A great starting point when setting a release time on the mix bus is to use a medium release time. There are two essential numbers that an engineer must memorize to understand general relative release times. Those numbers are 100 and 300. Between those numbers are medium release times. Above 300ms are slow release times. Below 100ms are fast release times. Start around 200ms and use your ears to set an appropriate release time! Use your eyes too… (Hint: Gain Reduction Meter) Also be prepared to convert from milliseconds to seconds and vice versa. (.1 s = 100ms)
Auto-Release
Many compressors have an auto release setting that can prove effective in a mix bus situation. If you are inexperienced with mix bus compression, then this may be a helpful release time setting option. The auto-release parameter is especially ideal for music that has distinct sections with different instruments or grooves in each unique section. It does a good job of automating the release time and reacting to the significant sonic and timing changes that might occur in a song. Try it out!

Native Instruments – Solid Bus Compressor set to Auto Release
Attack and Release Together
Pay very close attention to the attack and release settings of your mix-bus compressor because they can really make or break a mix. If your ear is not keen to the effects of compression across complex signals, then you could very easily put yourself on a road to a worse mix without realizing it. Too fast of an attack will kill low frequency transient content (punch). Too fast of a release time will sound like the music is pumping in a non-musical way. Too long of a release time will flatten the mix by keeping the compressor engaged too long and not allowing it to ever reach unity gain. The ears are always the first line of defense, but keep your eyes on the gain reduction meter and pay attention to its overall push and pull. After the attack and release is set properly, the gain reduction meter should move in relation to the tempo and/or groove of the music. Some engineers even set their attack and release times to musical values. For example, if a song tempo is at 100bpm then a 1/16th note value is equal to 150ms and a 1/8T (T=triplet) note value is equal to 200ms. Both of these note values converted to milliseconds (150ms and 200ms) meet our medium release time criteria. If you are struggling to dial in on a release time on the mix, using musical values and converting them to milliseconds (sometimes seconds) is usually a good start.
Exceptions to the Order
Contrary to “The Order” above… There are times when using a compressor on the mix bus after achieving a mix is acceptable if done strategically. One example would be using a multiband compressor to address very specific issues in a mix. Imagine a mix engineer has left the studio and is referencing a mix in the car. He or she will hear that mix in a new context… the low-mids are now coming through the mix too hot and muddying vocal intelligibility. Perhaps 6-8kHz is now sounding harsh. In either case, a multiband compressor could very effectively help address a specified problem that wasn’t addressed in the studio mix session. The most effective option would be to return to the studio and address the problems on a specific track or channel, but that costs time and money, which may or may not be available. A multiband compressor on the mix before mastering can be an effective way to address subtle tonal problems before mastering.
It would also be practical to take a completed mix to a studio and run it through several of their hardware mix-bus compressors that you probably do not own. This allows for the referencing of several different mix-bus options. Print and keep the ones you find sonically pleasing. Although, you may find that compression makes your mix sound different and not necessarily better, so be careful . Proper A/B testing with precise gain matching is a must in this situation. If you own the gear or have the studio budget then the best option would still be to mix through the hardware compressor of choice in real time (as we discussed in “The Order”). However, it could be very time efficient a to run a complete mix through many different classic bus compressors during a studio session and compare them later.
Final Thoughts
Using compression before mastering may or may not be a technique that fits your mix style. Regardless, as engineers it is our job to try new methods and learn their strengths and weaknesses in our workflow. Do not shy away from mix bus compression. Incorporate it into your mixing arsenal if it works for you. If it doesn’t work for you, then learning about it certainly expands your perspective on how compression treats more complex signals. In addition, these mix bus compression techniques can often translate into smaller busses and groups (ex. Vocal bus, drum bus, strings bus). Go choose a classic compressor (or digital emulation) for the job and have fun learning! Consistent growth is the name of this game.


